As previously known, one of the success of a blog is connected with social networking. This time we will discuss how to connect bloggers with google+ (later on we call it with G+), a social network owned by Google that is rapidly growing.
 |
| G+ pages |
As already announced by Google, that Google has
provided pages. Actually this step was preceded by
facebook. However, steps taken by Google is quite right. The reason, everyone wants more privacy. And for those of you who have blogs, this is an advantage. One of the advantages of G+ is a circle, because with circle then you will not be wrong to share. If you have a lot of categories (labels) on your blog, then these categories can be divided into several circles that correspond to the topic of the category (label).
As mentioned earlier, that one disadvantage of blogs is slow communication between users. With the use of social networking, then the weakness of the blog can be resolved.
 |
| Example G+ page |
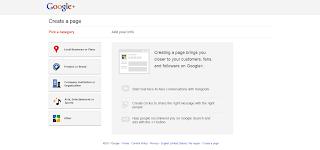
The first step before making G+ pages is that you must have a G+ account. Please
come to G+. After that
visit G+ pages, pick a category, add info of your page. Once you have managed to provide information about your property page, then you'll be taken to the page "
welcome". The address of the page you'll probably like
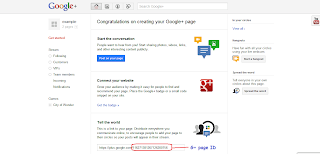
https://plus.google.com/u/0/b/G+ page ID/welcome. The identity of the G+ page is very important to create a badge G+ to be placed on your own site. Google has
announced the use of badges for the website.
 |
| G+ developers page |
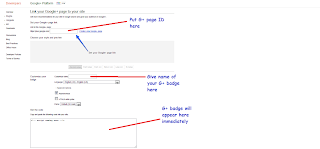
The next step is to visit the
G+ developers for the badge, you will see an empty box after
https://plus.google.com/, you have to do is fill in the empty box with G+ page ID that you created earlier. After that, select the name of the badge you want. Do not forget to choose the style of the badge. Once you successfully do that, then you will get a piece of script that you have to put on your site. Script provided by G+ badge consists of two parts. The first section is placed after the code <head> and before </ head>, while the second part is placed before the </ body>. Consider the following code example
Step three, open your
blogger account. Then click
Design -> Edit HTML, look for
<head> code. Then place the following code after <head>
then save. Once saved, then click Design -> Page Elements, then click the link "Add a Gadget". After that, a window will pop up a new page "Add a Gadget". All you have to do is select the gadget HTML / Javascript. After that, a window will pop up a new window "Configure HTML / Javascript". Place the following G+ badge code in the box "content"
Then save. Done, now you already have a G + badge on the website (blogger).


well explained and easy to start with tutorial for Blogger based blogs..
ReplyDeleteThank you rajesh
ReplyDelete