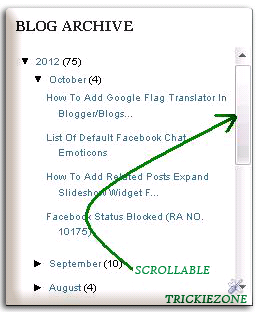
 |
| Screenshot |
Now, let's go follow the instructions below.
Tutorial:
1. Go to Blogger.com
2. Login to your account.
3. From your Blogger dashboard you will see a dropdown menu.
4. Choose Template and click Edit HTML.
5. Then Proceed
6. Check Expand Widget Templates you will see it at upper left.
7. Press CTRL + F and search this <div id=’ArchiveList’> tag.
8. You will see this, see the code below.
<div class='widget-content'>
<div id='ArchiveList'><div expr:id='data:widget.instanceId + "_ArchiveList"'>
<b:if cond='data:style == "HIERARCHY"'>
<b:include data='data' name='interval'/>
</b:if>
<b:if cond='data:style == "FLAT"'>
<b:include data='data' name='flat'/>
</b:if>
<b:if cond='data:style == "MENU"'>
<b:include data='data' name='menu'/>
</b:if>
</div>
</div>
<b:include name='quickedit'/>
</div>
</b:includable>
9. Replace with the code below.
<div class='widget-content'>
<div style='overflow: auto; margin: 0px auto; padding: 5px; height: 300px;width: 100%;text-align: left;'>
<div id='ArchiveList'>
<div expr:id='data:widget.instanceId + "_ArchiveList"'>
<b:if cond='data:style == "HIERARCHY"'>
<b:include data='data' name='interval'/>
</b:if>
<b:if cond='data:style == "FLAT"'>
<b:include data='data' name='flat'/>
</b:if>
<b:if cond='data:style == "MENU"'>
<b:include data='data' name='menu'/>
</b:if>
</div>
</div>
</div>
<b:include name='quickedit'/>
</div>
</b:includable>
10. Hit Save Template and view your blog.
Congratuations!
John Francel is a part time Blogger, Founder of Trickiezone. You can reach John by visiting the following Follow Me On Google+ | Like Us OnFacebook | Follow Us On Twitter | FollowUs On Pinterest | Follow TRICKIEZONE On Google+.

thanks for publishing this
ReplyDeleteYou are welcome
ReplyDeleteyou are welcome
ReplyDeleteThis exactly what I am looking for. Keep up postinghttp://www.tinyserval.com/
ReplyDelete